Click Image For The Sailboat Company's Home Page
DIY Projects for Com-Pac Yachts
The latest project listed will be at the top of this page. The old stuff is at the bottom of the page.
DIY 38: Our O'Day Launch construction is moving forward. This boat was a great daysailer back in the old days, but it had one problem and that was it had a fixed keel. Getting the boat on and off the trailer was difficult and that made the centerboard version a better choice. We plan on adding 300 pounds of concrete to the floor where the iron keel was attached. The hull is built like a tank and holding the ballast isn't going to be a problem. The cabin is going to have standing headroom with 2 bunks. A 7.5 hp outboard will be mounted in the middle of the transom for power.
All that green stuff in the mold is the release film that we spray in the mold before we lay our glass and resin. It keeps the resin from sticking to the mold. We will clean the mold with a water hose when it warms up outside.


DIY 37:
Trawler Design and Construction
Just about any boat can be a trawler. Some boats would be better than others and the right size boat for a trawler project is important. If you are going to travel across oceans, it needs to be big and if you are going to trailer, it needs to be small and then there is everything in between. For the most part, we are going to talk about building small trawlers on sailboat hulls that are affordable for the average sailor. The best source of the raw materials for trawler is a boat that’s already been built by someone else. Starting from scratch would take a long time and we are currently blessed with a large used sailboat inventory that’s getting older and cheaper by the day. My landfill charges $75 to destroy and bury a Catalina 22. Many great boats built in the 80s are going the way of the landfill.
Selecting a sailboat on Craig’s List that floats and looks good is easy. The price is always lower if the boat doesn’t have sails or if the mast is broken. A good trailer is important if you plan on moving your trawler from point to point. A 23 or a 22-foot sailboat may be your best option. Without a mast, that size sailboat is easy to launch and will be cost effective for home construction.
I like a shoal stub keel for a trawler. The boat will track well meaning less steering work for you. It will also lay beam to the wind and drag its keel sideways downwind with no power. That’s a good safety feature in most emergency situations. A deep keelboat will also work if you want to do the extra work of cutting the keel off. An iron keel is very difficult to cut, where steel and lead are relatively easy to reduce in size. To my eye, a traditional sailboat like the Montgomery or Com-Pac will make a good-looking trawler. Contemporary sailboats like the Macgregor will not look as good to me. The trawler’s vertical house needs to blend with the existing deck and hull. I think of this mismatch as a fast hull and deck married to a slow superstructure. Most traditional sailboats have vertical cabin sides that will bend well with the vertical house sides of a trawler. An older Mark I Catalina 22 is a boat that might work as a trawler. Some sailboat builders make their boats half traditional and half contemporary so they can sell boats to a larger group of people. I think the Catalina falls into this category. The iron centerboard isn’t as good as a stub keel, but keeping it up and in place will work. A house with a smaller visor and a little more slant in the forward windows should make a Catalina look like a trawler.
A major construction project for the do-it-yourselfer is building the house. The house has sides, a top and windows. I think the house has to compliment the looks of the boat and still have 6 feet of standing headroom inside. That’s a good reason to build a 22 or 23-foot trawler. A computer and a computer paint program is an easy way to add a house to a picture of an existing boat. You add a house to a picture by using the portion method. The portion method is where you measure the distance from the water line or boot stripe to the top of the hatch on a real boat. If that distance is 4 feet, you would need a 2 to 2 ˝ foot house if the inside floor is at the waterline. The house height includes the raised portion of the roof. A house that’s more rounded at the rear and more flat forward looks good to me. With the Catalina, the top/top would look better if it was a little flatter. This type of trawler will travel at displacement speeds of about 6 knots. If you want to go faster, you need a larger boat.
The house pillars need to be 2 inches edge to edge. Going from a side window cutout forward to a front window cutout is 4 inches. The material used to build the sides of the house can be anything as long as it is ˝ inch thick. That material is going to be glassed on both sides with surfboard glass to give it a fine finish. If you pick out a 1980 or newer boat for your project, the core material for the deck should be a man-made material that doesn’t rot with water penetration. This is a good thing. Plywood-cored decks should be avoided. We make decks in this country rigid so the deck feels solid under our feet. Other countries avoid rigid decks and the problems associated with wood cores.
Assemble the house sides and tape them together with 2-inch glass tape and resin. Set the house on the deck where it balanced from side to side and front to back. Mark the inside edge of the house with a magic marker. The bottom edge of the house needs to fit the deck. Most sailboats are flat in this area and you will have to make only minor adjustments for a good fit. The house is rigid at this point and the boat’s deck has been marked. Cut the hole in the deck at this time. Most sailboats have a bridge deck. That’s the little deck just aft of the sailboat cabin. It keeps the water out of the cabin when we have water in the cockpit. I like to keep part of the bridge deck intact for cockpit strength reasons. That’s normally a strong point at the end of the house. You may have to support the cockpit on some sailboats at this time. Some cockpits span too great a distance from side to side to support people going in and out of the house. Adding the house will increase the strength of this area.
You set the house on the boat and see how close you came to a perfect fit. Com-Pac sailboats decks are very rigid and they don’t change shape when you cut the hole for the house. We use West System Epoxy that comes in a tube for the first connection between the house and the deck. We will do more bonding at that joint before we finish. One way to build a top/top is to build your own with your own mold. Lay a white bathroom 4X8 foot panel on a flat floor. I buy mine at Lowes. The panel is slick, but it will still need to be waxed. Lay glass and resin on the panel in a smooth application. Get it to a thickness size of about 1/8 inch. Pop it off the mold and the laminate will bend to a shape from side to side. Make a wood frame that will hole the glass in the shape you designed on the computer. The bottom of the shape needs to match the top of house. Make sure you leave enough glass for a visor. Most trawlers have visors. After you have the shape right, add another 1/8 inch of glass to its inside surface. This will make the panel that’s still in the frame rigid and give it a permanent bend. With the top in the wood frame, glass a 2-inch vertical edge around the top. I like to use a rigid foam product that I glass in place. The 2-inch edge around the top/top needs to match the boat that you are building. Some may need to be larger, some smaller. After removing the top/top from the wood frame, it should fit the top edges of the house sides and look good.
Windows make or break a design. Sailboats have been built for years with ugly ports and most of these designs were failures. I won’t give you an example, but there are lots of them that didn’t make it. Look at other trawlers on the Internet and see what design you like best. Marine windows companies can make your windows or you can cut your own non-opening windows out of Lexan. Plastic frames are cheaper than aluminum frames and Lexan panes are normally cheaper than glass panes. The window companies require a pattern to make windows. They use a clamp design between the outside and inside frame. I make my patterns out of black construction paper and put them on the house to see how they are going to look.
We have talked about building the house sides, the top/top and the windows. The next step is the inside. A cool thing about most sailboats is that they have bunks in the main cabin. They are at a perfect height for two pedestal seats setting side by side. You can see through the windows while seated and also while standing on the existing cabin floor. I use ľ inch plywood as a pedestal and console platform. It shaped in a “U”, screwed to the bunks for mounting the interior furniture and it also makes a good entrance step.
Most 22/23-foot boats have a forward cabin, which isn’t modified in our trawler conversions. The space in front of the pedestal on the port side can be a table or a chest for storage. The space in front of the pedestal on the starboard is used for the console, steering, engine controls and instruments. The space on each side of the entrance and behind the pedestals is a storage area that really works well. Access is good and that area can hold lots of portable gear.
Most old boats can be buffed and waxed and they will look good for at lease a year. Painting the hull and deck will last for a long time and that finishing method is recommended. We use epoxy paint on the hull and it is not recommended for the casual painter. It’s a great paint, but it can be dangerous if you don’t use the right safety equipment. It’s also temperamental and following the instructions on the can doesn’t work for everyone (maybe no one). A good one-part paint will look almost as good and will last a long time. Some professionals use car paints from the car parts store. They need a clear coat after the color coat and they also have some of same problems as the epoxy marine paints. Painting the decks is a separate problem. The epoxy paints are very hard and most decks are too complicated to use them. You will have over spray as you paint from one surface to another. That over spray is too hard to remove and a good-looking paint job takes too long to finish. A good deck enamel will work better and the over spray can be buffed out and blended. We like to paint our trawlers in parts during construction. Most paints require several coats and the curing time differ from paint to paint.
The power for a trawler can be an outboard or a diesel. If you plan on taking long cruises using the ICW, you should think about a diesel. An outboard should handle most in-state cruising needs. Most sailboats that have been converted to trawlers can handle sails. I like to mount a mast in the cockpit and use furling gear with a special cut sail. The current Com-Pac 23T that we are building will have a mast in the cockpit. We plan on using the motor to tack the boat and make helm adjustments while sailing. We are trying to keep the cost down and dual helm installations are expensive. I will let you know if it works.
Why would anyone want a trawler? Being able to use a boat with 6 feet of inside standing headroom can be very comfortable. The first time I used a trawler was early winter and it was cold outside. If I had been on a sailboat, I would have been uncomfortable even with a cap, big jacket and gloves. The sun was shining through the windows on that trawler and it was really nice inside. I remember going down the ICW in FL in January and I was very cold in that sailboat cockpit. The standing headroom inside a trawler gives you room for 2 large chairs with lots of visibility. A nice feature normally found only on larger boats. For the last 10 or so years, I did most of my sailboat sailing with just a furling genoa. It’s called lazy sailing and I’m guilty. The mainsail is normally too much trouble unless you really need a mainsail. With the trawler, you have only one sail and if you need a main, you start the engine.
DIY 36: Trailer sailors need to check their trailer bunks. Just about every trailer that comes through The Sailboat Company has their bunks adjusted too high at the rear. This looks good for security or for going down the highway, but doesn't work that well for launching. We put small wheels and drop axles on trailers to make trailers low for easy launching and then we make the boat climb over poorly adjusted bunks to get off the trailer. Most Com-Pacs are secure using the bow eye and the forward portion of the trailer bunk. If your car is getting wet at the ramp or your trailer appears to be too short, adjusting the bunks may help.

DIY 35: Building a house on a sailboat isn't as hard as it might seem. We use Luan plywood to build patterns. You can hold the pieces together with tape or anything else to get an idea of how the boat will look. You use the finished pattern pieces to cut the material you use for the house sides. We currently use a foam/fiberglass 1/2-inch panel for our sides. We have used 1/4 inch Luan with glass on both sides. Both work well. After we cut the pieces for the house, we fit the panels to the boat and glass tape the edges. This gives us a rigid house that can be moved. When we have a good fit, we mark the boat with a line inside the house. A fine magic marker works well. Follow the line with a jigsaw. Epoxy the edge of the house to the boat. We use the West System Epoxy that comes in a tube for a fast neat joint. The area outside the joint between the house and the boat needs a layer of fiberglass tape. This tape will be covered and finished with a filler. Our final finish makes the joint disappear from the outside. The inside joint also needs glass tape over the joint. The inside joint is normally covered with a decoration of teak or paint. We have a mold for our glass top and that's easy to use. Our first top was made from a curved piece of Luan and finished with glass and resin. The edge around the top was 1/2-inch foam glassed to the top. We currently build our sides on an upside down top. This makes for a good reference when we put the side together. Fitting the sides to the boat first works the same way, but keeping the boat clean during this process is more difficult.
We do Com-Pac 16s and 23s, but just about any sailboat will work. I think a Com-Pac Horizon Cat with a house installed would look and function like a Tug. We may build one someday.

DIY 34: All old diesel sailboats will need motor service at some point. Com-Pac sold over a hundred Com-Pac 23Ds with diesel motors and they have been very reliable. Boats used in salt water will have more wear and tear than boats used in fresh water. One problem with the 23D is that owners use them as a boat to travel to far off places. The engines have more hours on them because they are used more. Most of the places have shoal water with lots of sand like the Bahamas and Florida. A 23D would go aground and the owner will use the engine to get off that under water sand dune. Most sailboats would damage their cooling system with all that sand, but the 1GM10 in the 23D for the most part keeps on running. You need to use an acid bath product to clean the cooling system every 5 or so years to keep the engine running cool if you sail in salt water.
The picture below shows a new head for an old engine. The engine is from a salt-water boat that has lots of travel hours on the engine. A stuck valve caused the failure. The old head could have been repaired, but a new head cost just a little more. We checked the piston rings and the bearings and they are in excellent condition. Someone changed the oil and the filter often on this boat. This engine should see another 20 years of service.

DIY 33: Don Nemetz has been working on his Sun Cat Frisky. The pictures show some quality workmanship and some big improvements. Moving the center of effort forward on almost any sailboat will improve performance if you are looking for more power. The bowsprit and jib would be a big improvement for most Sun Cat sailors if they sail in a light wind area. Frisky has some speed in the first picture.


DIY 32: Don Nemetz of Port Charlotte, FL has made another modification to his Sun Cat. Frisky is a good looking Sun Cat. His comments are as follows: "Just thought I'd update you with some photos of my latest homemade Polytarp sail creation. The sail is made from 3.3 oz Orange Polytarp from TarpaflexUSA and measures just under 75 sq. ft.. Had it out for sea trials a few days ago in very light air and it performed quite well indeed. It more than met my expectations for improvement of boat performance in light air conditions. And, the balance of the Rig was not too adversely affected. In less than 5 mph winds had a slight lee to neutral helm which became more neutral as winds picked up over 5 but less than 10. Steering with the "Factory" rudder was effortless, like power steering on a car. With a little boat speed I tacked several times with no problems whatsoever. On a close reach "Frisky" just heeled over slightly and sliced through the almost flat chop on Charlotte Harbor. Periodically glancing up at the tell tales on the main'sl it appeared to enjoy the company of the Large Drifter, taking advantage of the "slot" effect to improve its efficiency."

DIY 31: A new quick way to build our 16-trawler top is to do it upside down. We build a top/top using 3 layers of 1.5-ounce fiberglass mat in our mold. Our next top will have a core and 2 layers of 1.5-ounce. The top/top is turned upside down and our pre-cut COOSA panels are glassed to the top. This holds everything in place before you fit, mark and cut the big hole in the cabin top. I used the angle between the front windows from an existing boat and tacked those two panels together first. The other panels fit the top/top with a 1/2-inch space between the panels and the outer edge. We plan on building the 23 Trawler's top/top the same way.

DIY 30: A new anchor system for the Com-Pac 16 (Mark I) works well. It's a Com-Pac Legacy anchor roller from Com-Pac and only cost $75. The picture below shows the anchor roller and furling installed on a Mark I. You have to drill one hole in the stainless to accept the forestay or in this case, the furling. I like the modification.

DIY 29: We have one CP-16 trawler kit available now. It will be available as a seprate purchase until we start our next conversion.

DIY 28: Sailors know that they may not have the right sail for their conditions when they go sailing. If you only have one sail, your options are limited. Old catboats solved this problem with a very large sail that could be reefed when required. They did lots of reefing. Com-Pac went the other way with the Sun Cat and made their sail small for windy conditions. If you sail on the coast of North Carolina, it's perfect. We only live a few miles from the Graveyard of the Atlantic with its Gulf Stream winds. Don Nemetz of Port Charlotte, FL found his conditions on the light side and he knew he needed more power for his light conditions. He made some modifications to his sail plan that made his boat more usable in his area. I think lake sailors will find these modifications very interesting. The first picture is a small jib that will increase mainsail power. The second picture is a light wind replacement sail for the main. All sails need to be easy to install and remove. Notice how Don rigged his sails. Using a light wind sail in light conditions makes sailing more enjoyable. That's a good looking Sun Cat.


DIY 27: No one likes doing bottom paint because it's a dirty job. If your boat is new, it should have a barrier coat before bottom paint is applied. The Sailboat Company and Com-Pac Yachts have been doing barrier coats on new boats since 1989. That's when the barrier coat application became available. If you currently have bottom paint on your boat, your old paint acts as a barrier coat. The reason we use a barrier coat is to prevent blisters. The warm water in the southern part of the United States is warm enough to create blisters on fiberglass boats. Old bottom paint could be removed for various reasons. Some bottom paints remove themselves with use. Others need to be removed to make the bottoms smooth. If you see bare gel-coat on the bottom, you need a barrier coat to prevent blisters in warm waters.
Doing a bottom is getting harder because our paints are getting less capable and more expensive. The price of copper at the New York Stock Exchange is very high. Years ago we used a tin bottom paint that was very effective and cheap. Today we use a copper bottom paint that's expensive and less effective. Tomorrow, we may use a latex paint that requires painting the bottom several times during the year. A small boat on a trailer is looking better all the time. EPA regulations reduce fish deaths in marinas.
Doing your own bottom job may be OK if you have your own tools and lots of time. Painting a bottom on a trailer is difficult and will normally reduce the value of your trailer. Don't get paint on the trailer. Cleaning and sanding is required. Lots of cleaning and sanding to remove loose paint and foreign material will be required. You need to wear a mask during this operation. The old paint needs to be smooth before painting. The temperature needs to be 50 degrees or higher and follow the directions on the can. With copper, you need to stir the paint for a long time. 85% copper content takes lots of stirring. 25% will take less stirring. You buy your paint for your intended use. On the ocean, you need lots of copper. On a river some distance from the ocean, you will need less copper. We use a hard, sloughing (ablative) paint on trailable boats. Less copper in the paint will help the painting process.
What if the person that owned the boat before you didn't do a very good job or used sloughing (ablative) paint? Your paint is going to stick to his paint, but his paint may fail or fall off with your new paint attached. Removing the old paint will cost more and if the bottom has been abused, a lot more. The best solution for the unknown is to paint and hope for success. If your new paint job fails, sand the spot and touchup as required.
There have been owners that have had some success doing their own bottoms. A Com-Pac 23 can be tied to a tree and the trailer removed by blocking the keel as the trailer comes forward pulled by the vehicle. A tree behind to hold the boat in place and one on each side to keep the boat from falling over has worked. The blocks under the keel should be the same height as the trailer rollers and they need to hold 3000 pounds. 2 8X8 inch wood blocks stacked works well. You will need as least 2 stacks. The lines securing the boat to the trees need to be low stretch lines. This practice should work for 23 and smaller boats. You replace the trailer using the trailer winch.
The new ablative paints works well if you scrub the bottom with a brush several times during the season. When the paint disappears, it's time to paint again. If the old paint is one color and your new paint is a different color, it's time to paint when you see the old paint. It's a good system if you keep your boat in the water all the time. If you have a high copper paint, you will see copper after the first brush cleaning job.
Boats that have high growth on the bottom will cost lots money to get right. We have seen boats with oyster beds growing on the bottom. The idea is to replace the bottom paint when the bottom is still smooth. We have seen paint last for 3 seasons in the lower Neuse River and 1 season in a marina next to the ocean. Putting paint on a smooth bottom is cheap compared to a boat that has lots of growth.
A desirable situation for boats that live on the coast and spend their non-sailing season on the trailer is as follows: A high copper paint that's ablative on a smooth bottom. Wash the bottom once with a brush during the middle of the sailing season. When the boat gets to the trailer, use an 80 grit sanding block to light sand the bottom. The paint will start to look copper in color that's OK for the next season. Keep up the cleaning and light sanding until the copper color is gone and the old, old paint is visible. That's the time to paint the bottom again. Boats on lakes need their bottom cleaned and a smooth bottom. You don't have to worry about the paint's copper content.
DIY 26: This is a big DIY project and helps to have your own boat yard next door. The Yamaha 25 that I have been working on for several years made to the water and I'm pleased so far. Most of the personal boats that I own are project boats. If you read this Web site, I'm sure you heard me say that all sailboats are territorial. I live about 100 miles from the graveyard of the Atlantic and we have some pretty good wind. Foreign sailing teams come to this area to practice heavy weather sailing. Older people sailing a daysailor without a wetsuits during the wintertime on some of our coastal rivers is a mistake. The same thing applies to young people on a Sunfish in the spring. The water is too cold and you can die from the cold. Back to the Yamaha 25. The Yamaha 25 is a boat that has 40% of its weight in the keel and a powerful sail plan for ocean racing. With a draft of 5 feet 5 inches, the boat is not practical for coastal sailing in North Carolina. Boats that are not usable in an area are not worth very much. I think that's called cheap. There is a group of Yamaha 25s in Oregon and Washington State where they have deeper water and much higher resale value. This boat was a military boat that found it way to North Carolina with a serviceman. To make it a usable boat in North Carolina, it had to have 4 feet or less draft. It still needed to be stiff and it needed to be a coastal boat, not an ocean boat. The joy of coastal sailing is the way the wind moves around the terrain and how you and your boat react to those changes. I cut off 14 inches of keel that reduced the keel weight by 500 pounds. Currently in the water, the boat draws 3 feet 10 inches. I added 200 pounds of lead to the interior and the boat draft is 4 feet. I like the way the boat feels in the slip. I added furling gear because the deck of the Yamaha is not flat. I have several Com-Pac 23 sails and an extra mast that I installed. The 23 mast is 6 feet shorter. The boat has a new 1GM10 Yanmar motor that's smaller in size and bigger in horsepower. I will report how she sails in the spring.


DIY 25: We have talked about the hatch slides leaking on all Com-Pac boats. Easy to fix, but you have to keep your eyes open for wet cushions and water under the cushions. I see water on the floor of some 16s, Mark III and newer now and then. This isn't from the hatch slides and it can be several inches of water. This problem is normally the cockpit drains. This model boat has the teak grate over the fuel tank storage area. The little drainpipe between the cockpit and the transom is very short and difficult to reach from the outside. The access ports on each side helps a little, but not when it comes to sealing the inside drain joints. The transom uses flapper valves to seal the joints on the transom. The seal between the cockpit and the drain on the inside is only a bead of caulking and that's our problem. Caulking is really designed to seal a joint between 2 surfaces that are pressed together. Laying a bead of caulking is only a temporary seal. When the caulking fails, water goes inside the boat and it makes it way to the lowest point. The lowest point in a 16 is the cabin floor.
A more permanent fix for this problem may be installing a flapper valve on the cockpit side of the drains. The PVC drains will need to be cut down flush with the cockpit surface. Cut the flap off and keep the remaining rubber ring and plastic ring. This may be more difficult to do, but it should be a permanent repair.
DIY 24: Port leaks on Com-Pac's oval ports are rare, but sometimes the 3M5200 gets old and the bond separates between the boat and the port. Most owners think it's the gasket that's leaking and they do all kinds of things to fix the leak. One common leak is in the aft starboard port on 23s. We have had 2 boats that leaked at this spot. The sealant area between the port and the boat is very small. The inside flange is over wood trim and no one seals this area. The sealant between inside and outside metal is broken in the picture below. Oval ports can be rebuilt by the owner. Remove the gasket and then remove the screws that hold the glass retaining ring. Some boats from FL have bad glass (the plastic in the safety glass melts in the heat) and it should be changed when you work on a port. We use clear Lexan to replace the glass. 2 pieces of 1/2 inch Lexan is the same thickness as the glass. We also make our own gaskets. You can buy Wet-Suit material on the Internet. We use 2 thick nesses and put them together with contact cement. Use contact cement to install the gasket in the port. It's a better gasket material than the original and should last a long time.

DIY 23: Bending stainless steel is easy. Cut 2 circles out of 1/2 plywood. The circles need to be 12 inches in diameter. Lay a 2X4 on the edge of a 4X8 sheet of plywood. You can frame the plywood or make it where it lays on saw horses. Put the 2 circles, one on top of the other in the middle of the 8-foot length and 7/8 of an inch from the 2X4. The circles and the 2X4 have to be attached to the 4X8 sheet of plywood securely. Drop a length of 7/8th stainless between the circles and the 2X4 and bend away. You use the end of the stainless as a handle to do your bending. If you want both ends of a piece of stainless to have similar bends, bend one end and make a mark on the plywood. Turn the stainless over then bend the other end. The idea is to have a smooth bend and both ends need to be bent the same amount. 7/8 inch stainless is used for projects that require bending. 1 inch stainless is difficult to bend and is best used for straight pieces.
DIY 22: I decided many years ago that I liked English cars. The reason was that they came with a maintenance manual and a tool kit for DIY maintenance. I liked saving money on my car with DIY maintenance and the car professionals were few and far between. Balancing the old SU carburetors was a little tricky, but the manual solved that problem for me. We may be coming back to the good old days with the little diesel motor in our sailboats. Today’s four stroke outboards are heavy, complicated and expensive. The weight on the transom has added to crew weight to generate a balance problem for most small sailboats. Sailboats are supposed to maintain their balance like airplanes. You don't send all the large people to the rear of the airplane at the same time. A new EPA requirement coming out this year may also make new outboards more difficult to maintain and use. We may have a few years of pollution control problems to live with like the ones we had with our cars in the 1960s. Alcohol in our gas may be another big problem. A diesel motor in the middle of the boat over the ballast really works well and most sailboats sail better in this configuration.
Spring is a good time to change oil and the oil filter on your inboard diesel engine. Changing oil is a once a year job and doing it early gets it out of way for the sailing season. Start the engine and let it warm up. This may take some time if the weather is still cool. Stop the engine and remove the oil with a suction pump. Spin the old oil filter off and replace the filter and add new oil. Start the engine and check for leaks. That's about all most people do to their diesel motors on a scheduled basis. It pretty easy to do and most people can do it without any special training or tools.
A common problem that happens about every 3 years is the raw water pump impellor needs to changed. Follow the instructions in the manual when the pump stops pumping. Common tools with a new replacement gasket and impellor are all that's required. It takes about 30 minutes to do the job.
Changing the fuel filters is needed when required. Your engine starts running slower or stops. Keeping the filter changing process neat will prevent diesel smell in the boat. Some diesel boats smell like diesel fuel and this can be traced to spilled fuel.
That's about all there is to diesel maintenance. Being less complicated is good thing when it comes to motors.
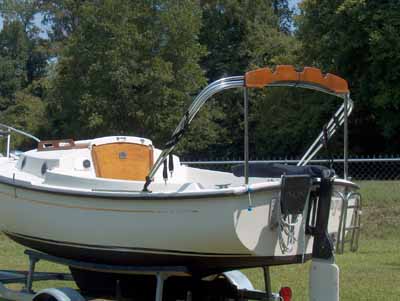
DIY 21: This is a great project for any traditional boat. A teak boom gallows on a traditional boat really makes the boat look good. All the old traditional boats that sailed around the World had boom gallows. This is an affordable improvement that will work on any small sailboat to 23 feet. Com-Pac builds their boom gallows in-house and they are all the same size. The teak that connects between the uprights is generic to all Com-Pacs. The up-rights change for the different models. The reason the up-rights change is the deck angles change from model to model. The way the generic gallows handles this problem is by cutting the up-right in half and rotating the bottom or deck connection end to make the up-right vertical from front to back and side to side. Sorry about the long sentence, it needed to be said that way. The up-rights are put back together again with a splice. We learned how to connect stainless steel tubing with our rumble seat project. An included 7/8-inch tube fits inside the 1-inch up-right tube like a glove. On the Com-Pac 16, we use the boom gallows as a mast carrier and it's also a great handle for getting on and off the boat. Ask Com-Pac for the "generic" Sun Cat boom gallows (designed by The Sailboat Company) when you order with your credit card.

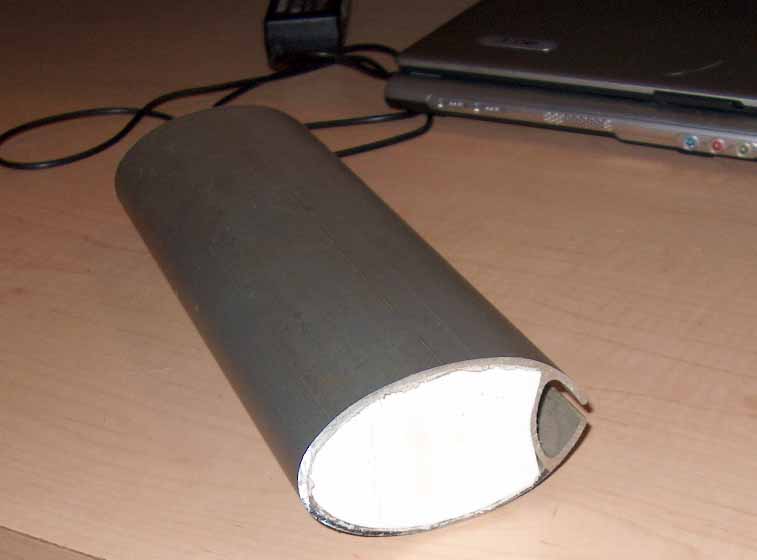
DIY 20: Building a flash mold is easy. We had a hatch liner on our Coastal Packet that leaked. The liner was made from Starboard. Starboard is a material that's easy to work with, looks good and is almost impossible to seal. Starboard is very slick and that's what keeps it from sealing with caulking to other glue type materials. We removed the Starboard liner, cleaned it up and the liner became a plug for a new liner mold. The Starboard works well because the material is slick and the mold glass and resin can be separated without major problems. Normally anything that has four vertical sides has separation problems. We waxed the Starboard anyway and the mold did separate well. Since the Starboard had the size and shape that we wanted, we had a flash mold for our new liner. It was fast and easy to build. We waxed the mold and laid enough glass and resin for a 1/4-inch laminate. The laminate came out of the mold, but not as easy as the mold separation from the Starboard. We finished the laminate with some sandpaper, filler and then gel-coated the whole thing with lots of gel-coat. It works well and dosen't leak.
The picture shows the hatch liner plug (right), mold (middle) and the laminate on the left. The trawler top in the background belongs to a Com-Pac 16 trawler. The AWL-Grip paint makes for a very shiny surface.

DIY 19: Getting the mast up is a problem on most sailboats. If you have a short mast, life is better. If you have a tall mast, life can be hell. Most of the new Com-Pac boats have systems to make raising the mast better and we can after-market most of those systems. One big problem in the past was that Com-Pac didn't have a good mast raising solution for the CP-23. I think we (The Sailboat Company) have resolved this problem. In fact, we have designed several systems to raise the 23 mast. You can do it on the trailer using the trailer winch or you can do it on the boat using a new tabernacle made by Com-Pac. We are going to talk about the new system in this project.
The Horizon Cat mast and the CP-23 mast is the same mast. The Horizon Cat is shorter and that's the only difference. We can use a Horizon Cat hinge on a 23 mast and it work just fine. The Horizon Cat has a stub mast (short length of mast) that's held in place in the boat. We can't do that with a 23 because the area under the mast in the boat is a passageway. The stub has to be rigid to allow us to push and pull when we raise and lower the mast. The new tabernacle does this with everything above the deck.
You need to cut your mast at the right point. Part of your mast will be the stub and the other part will be mated to the stub with the hinge. It helps to have a mast gallows to rest the mast on when the mast is folded. The stub has to have room for the boom slide and sail slides in the folded position. You can carry your sail and boom under a sail cover when the mast is down. The hinge comes with a stainless knob that takes a jack pole for raising the mast. You can raise the mast with a halyard winch in this configuration.
There are a few secrets to installing a hinge on a mast. Check with me before installation. The installation is easy and it works.
DIY 18: People that make things have to make them fast if they want to stay in business. Henry Ford came up with that idea and it is still used today. Com-Pac started building boats in the early 70s and they decided that caulking the screws that hold the hatch slides to the top of the boat wasn't necessary. They thought that the wood pulled into the screws would seal the slides. That didn't happen and all of our old boats leaked. When you see water on or under the cushions, it's the screws holding the hatch slides that's leaking. The 16s built before 1980 had a wood core. The leaking screws water soaked the core and made a big problem. You can this problem when the fiberglass separates around your hatch entrance. Boats after 1979 didn't use a wood core, but they could still leak from the hatch slide screws. The fix for this problem is to remove all the screws one at time and caulk the screws and replace. Replacing the screws with caulking solves the leaking problem. This problem is still common on most old 16s, 19s and 23s. Newer boats like the Sun Cat and Horizon Cat are currently being caulked by the Factory.
Another leaking problem is common with the Mark II 23s. They have teak battens attached to a white bathroom panel inside the cabin. The panel is attached to the boat with screws that are screwed into the hull to deck joint. The bathroom panel can be changed by buying a new panel from Lowes or Home Depot. The battens are removed and installed in the new panels. Seal the screw holes from the old installation, but don't replace the screws. The panel will work without the problem screws. Both ends of the panel are also held in place by bulkheads.
All Com-Pac Yachts should be dry boats. Your boat will be worth more if it's a dry boat.
DIY 17: A cool project for any sailboat with a stern (stainless steel) pulpit is our new rumble seat modification. It's going to make sailing more comfortable and enjoyable. Our catbird variation is called a rumble seat and it works about the same as it did in the old Ford Model A. I have always liked the catbird seats installed on some Com-Pac sailboats, but installing them after the fact was very expensive. The rumble seat is cheaper and it\rquote s going to be more comfortable.
You don't have to remove the pulpit from the boat and you don't have to bend any stainless steel to make this project work. You do have to understand that a 7/8-inch pipe will fit inside a 1 inch and you will use that technique building this project. You will also need to cut your stern pulpit into 5 pieces with a hacksaw. We cut the uprights pieces 6 inches above the deck and the horizontal splice piece in the middle of the straight span.
Not all stern pulpits are perfect. Sometimes they may lean to the side. A leaning pulpit will work, but it's not going to get better with the rumble seat installed. If both sides of the pulpit lean the same amount in opposite directions, it's going to look good. West Marine sells stainless steel pipe. You will need 2 short pieces of 1-inch pipe for the upper rail splices. The seat parts are made from 7/8-inch stainless pipe. 2 pieces to span the distance between the uprights and 2 short pieces (12 inches) for the fore and aft seat supports. The fittings are all 7/8 inch stainless and they can be identified in the picture below. All the fittings are available from West Marine.
When our seat is finished and working, we plan on taking it apart again and connecting the parts together with the new West System epoxy in a tube. We could drill holes in the splices and use pop rivets, but the epoxy will be faster and I don't like the set-screw arrangement for the fittings. When we put it back together again, it's going to be a permanent installation.
We used Starboard for the seat board in the picture. Teak would be nice, but that would be a little expensive. We may have to cut a hole in the seat for the backstay and the rudder lock down handle will need to be a little longer to make that function work from the seat position. We plan on making the handle 14 inches longer. We don't see a problem using an outboard motor with the rumble seat. We will tell you how the seat works when we put the boat in the water.

DIY 16: Old Com-Pac 16s had vinyl cushions in the early days and most of those cushions have died from old age. Owners didn't buy new cushions because they were expensive. Com-Pac came up with a new feature in their new Legacy that is very popular. The cushions are an option on the Legacy that no one buys (cost), but the boat has a standard indoor-outdoor rug installed over the bunk area that works well and looks good. If that idea will work on the Legacy, it should work on all of our old 16s without cushions. We just did this project on a 1976 model and it looks good. You can buy a rug from Lowes that\rquote s 6 feet wide and 5 feet long. That size will cover the bunks will a little extra left over. We used a heavy rug with a pleat. You roll the edges under the bunk boards and staple. We also used contact cement to hold the rug in place while we trimmed the outer edges with a box cuter. We cemented a nice black rug between the bunks. It's a big improvement over the missing cushion problem.

DIY 15: A project that most people dread is replacing the trim tape on a boat. Installing the new tape isn't that bad, but removing the old is really hard. The hair dryer trick doesn't work that well and a razor blade can damage the gel-coat and maybe a finger or two. The automobile people have a tool that really works well and it basically erases the old tape. You can buy the tool at a car parts store and they are not expensive. Using the tool in a drill works well, but you need to keep the drill speed slow. You can burn a spot in the gel-coat or paint if you run too fast or for too long in one spot. After buffing and waxing, your old hull may look better than it did when it was new. Most marine tapes come with plastic cover on the outside. This allows you to pull and bend the tape without stretching the tape. This outside cover should be removed after the tape is in place on the boat. The plastic will turn white with time and fall off.

DIY 14: We have all wanted to do touch-up work on our boats at times. Most jobs require a shop that has an air-compressor and other painting equpment. We now have something new that's going to help boat owners make their boat look better without going to a shop. It's a portable sprayer that can be used with most liquids and it can be reused several times. The sprayer and the bottle can be cleaned after each use. We are currently doing most of our small gel-coat work on our yard with this equipment. The sprayer does a faster job and you can see the repair better when you work outside in the sun. You need to be careful with wind direction because you could spray someone else\rquote s boat. The little spray bottle cost $7 plus shipping. Is this a cool tool or what?

DIY 13: Sun Cats are great boats with very little working room in the bow. Installing a bow roller, a deck pipe or anything else in the bow area is difficult. The big problem is that pretty teak bulkhead with the little door. Getting the battery in and out is a tight proposition and working on hardware up there is almost impossible unless you have 6-foot arms. The easy way to install equipment in the bow is to remove the teak bulkhead. 4 screws hold the bulkhead in place and they are located behind the small trim pieces on the sides of the bulkhead. The trim pieces are nailed in place and they can be removed with a thin tool between the trim and the bulkhead. Don't mar the finish as you ease the trim pieces off. Mark up and down and right and left because you are going to use the same nail hole to re-install the trim. Move the bulkhead to a position like the one in the picture and the bow hardware will be in arms reach. Not easy arms reach, but a lot better.

DIY 12: DIY Projects 12 and 11 go together. Read both projects for a better understanding of how to repair gel-coat. New boat gel-coat is easy to repair. Just follow the instructions in Project 14 below. An older boat repair is more difficult to do and it takes more time to make your problem go away. The difference between the two is the natural chalk that an old boat generates over time. You can look at the gel-coat under a hatch edge on an older boat and see what the original gel-coat looked like when it was new. Gel-coat that's been exposed to the sun appears to be much lighter. Some boats appear to be almost white, even thought the original color was an off white or cream color when new. Dark colored hulls and decks are more of a problem.
Matching a color is more difficult with older boats. I like to think that we have a new boat color hiding under the chalk and that's true. Removing the chalk from an older boat is an expensive and time-consuming proposition and not very practical. We could match the current color that's been modified by the chalk (lighter), but when we work the repair, the original gel-coat will show through as a halo around the repair. A better solution is to repair a whole panel. We can fool our eyes with this automobile repair solution. Most people have a hard time picking out small color differences if a whole panel has been gel-coated or changed. We normally spray our repaired panel with a gun to get the right type of coverage.
The best place to buy your gel-coat is from the boat builder if you have a new boat. A builder will not have gel-coat for their older boats. There are several sources for colored gel-coat on the Internet. You can also mix your own with a base and pigment obtained from West Marine. Both solutions will work, but they both take lots of trial and error and time.
Some gel-coats come with no wax in the can or bottle. Some boat builders might send out a container of gel-coat without adding any wax to the container. Your gel-coat will never get hard if it doesn't have wax added to the gel-coat. If you do get some gel-coat without wax added, you could try covering your gel-coat with tape. Gel-coat without wax is used in the laminating process and the absence of air should make it kick. That's how a boat builder builds boats. It will take a little longer to get hard. Most gel-coats used for repairs will have wax mixed with the gel-coat. The shelf life of gel-coat is not very long and the absence of air in the container will make a small quantity of gel-coat kick in the container. Keeping the container cold could make it last a little longer.
Paint is better than gel-coat as a marine finish. Paint is much harder than gel-coat and will keep its shine for a longer period of time. The reason boat builders use gel-coat is gel-coat is the cheapest way to build a boat. If we are going to restore or refinish a boat at some point in time, the best solution is paint.
Most first time gel-coat repair people think they can repair a crack by just using some new gel-coat. Cracks can't be repaired until they are opened up with a tool. The crack must be at least 1/8 inch wide and maybe a little more. If you don't like the idea of making holes in your boat, you need to practice on something else first. Use a Dremel to cut the gel-coat next to the crack and then fill that space with filler and gel-coat as required.
Gel-coat, MEK harder (you can buy it at a Car Parts Store), a Dremel and an assortment of wet/dry sandpaper (600, 800, 1000 and 1500) are the main gel-coat repair tools. When your gel-coat repair is as good as it is going to get, it time to buff and wax the repair. Good luck with your repairs.
DIY 11: If you own a sailboat, you are going to have a gel-coat problem at some point in time. You may hit a dock, ding the boat on the trailer or do something else that requires a repair. When that happens, the boo-boo needs to look like it never happen. The repair is easy, but it takes time to do it right.
The first thing we should do is evaluate the damage. We should check the depth of the existing gel-coat because we will have to blend our new gel-coat into the original gel-coat. If the existing gel-coat is very thin, blending will be difficult. The next step is to check the depth of the damage. A filler will be needed in most cases. You can fill the damaged area with gel-coat if you only have a shallow repair. Let say in this case, the gel-coat is damaged into the glass and the color of the glass is light brown. The gel-coat color in this example is white. Since thin gel-coat can be transparent, you might see the light brown glass through the gel-coat unless the gel-coat is very heavy or unless you used a white filler under the gel-coat. Using a white filler is the best solution. Fill the repair with a white filler and make it level with the surrounding area. Use tape to prevent damage to the surrounding area when you work your repair. When the filler is hard, reduce the filler with a tool down to the bottom of the original gel-coat. Fill this new space with gel-coat and work the area between the new and old with 1000 wet sandpaper. If the old gel-coat is thin, you might see through the old stuff at this time. Avoid this problem if possible. The picture below shows a repair that's ready to be sanded. The next project will review buying gel-coat, gel-coat repairs for old and new boats, spraying gel-coat, tools and answers to other related gel-coat problems.

DIY 10: You need to stop your Sun Cat from leaking. Some Sun Cats have had water leaks since they were new and they need to be repaired. I will start with the most common leak and work my way down to the most complicated.
Ports: The ports are plastic ports and they were installed with 3M5200 sealant. The ports can leak at the sealant joint or they can leak where the glass makes contact with the frame. Plastic frames can bend and the glass in the ports can't. A test for a port is to watch rainwater puddle between the frame and the glass. If the water doesn't puddle, the water is going inside the boat. You can see the damage inside a boat from the rainwater. The cabin ceilings with the teak strips will need to be replaced. A fix for the sealant problem is to remove the outside trim pieces and caulk the seam. A frame that doesn't match the flat glass will need the port adjusted. If your port gaskets are damaged, Com-Pac has new gaskets in stock.
Mast Stub: The mast stub should be checked for a good seal at the base of the mast where the mast enters the deck. The sail slug groove in the mast must be sealed and it is hard to do. The stub itself is open at the top and will also leak water inside the boat. That's 3 places in the mast area that can leak. A fix is to caulk the mast base and the mast groove and install a plug at the top of the stub. The area under the mast should be dry.
Seat Hatches: All Sun Cats have gutters that protect their seat hatches from taking on water. The Sun Cat gutters are too shallow. If you park your Sun Cat at an odd angle when it is on the trailer, rainwater can overflow a gutter and go into the bilge. If you have rainwater in the aft bilge, it will become visible in the forward bilge after you trailer or launch your boat. This is common in the early boats with the full centerboard housing. The big question for people with those boats is where did all that water come from? The answer is that it came from the aft bilge and those low gutters. You can't see the water in the aft bilge until it moves forward.
Older Sun Cats with the full centerboard housing can have a centerboard pennant leak. All Sun Cats can and will get some water in the cockpit when they go fast. Water rushing into the centerboard housing will move up the pennant tube and you will see water in the cockpit. Some of the older boats may have a leak between the deck and the pennant tube inside the boat. To check for leaks, you tie a dry cloth to the centerboard pennant tube under the deck. The cloth should still be dry after a good run with the motor. If the cloth is wet, you need to repair the leak with small 2 inch fiberglass tape. Wet the tape with resin and wrap the tape around the tube from the bottom to the top. This will do 2 things. It prevents the rigid tube and the flexible deck from breaking the seal at the cockpit floor when a large sailor moves around in the cockpit and it will also seal the tube. There are several variations in the pennant connection for older boats and this fix will work for all of them.
All Sun Cats have stainless steel centerboard housings. They also have zincs installed on their centerboards. If you don't maintain your zincs and you leave your boat in the water all the time, your centerboard housing screws can become damaged and your centerboard housing could leak. Electrolysis is what does the damage. Inspect your boat if it has been in the water for a long period of time. The screw head should look like new. If your screw heads look bad and the boat doesn't leak, check your zincs and renew. Tin bottom paint should be used on your centerboard and the housing. Don't use copper. The tin paint that should be used is designed for the inboard/outboard lower unit on powerboats. Copper paint on metal will increase the possibility of electrolysis. (up-date: The housing is now fiberglass)
A few early Sun Cats have a gas storage hatch that was made out of plywood and painted. Most of these hatches work well and don't leak. A fix for a damaged hatch is to lay 6-inch wide fiberglass tape inside the hatch. The tape covers the bottom, sides and back of the hatch. We use heavy tape and lots of resin. The old hatch is being used as a mold for the new hatch. The glass becomes a waterproof pan with a good connection to the drain in the rear and the floor in the front. We drill a hole through the glass to make the drain work through the glass.
I think that covers the all the possible leaks. Most users shouldn't have any leaks and that's great. If you do have a leak, find it and fix it is the best plan. A dry boat will be worth more when it comes time to trade boats and a good boat deserves to be a dry boat.
DIY 9: A Mark I Com-Pac 16 is a great boat. It's a very basic boat compared to the Com-Pac 16 Mark II and the other newer Com-Pac 16 sailboats. It has a short aluminum bow pulpit that limits most improvements at the bow. This project modifies the bow pulpit and makes room for a new Com-Pac Legacy anchor roller. The secret to this improvement is that some 1-inch stainless steel tubing can be used as a splice for our 7/8 inch aluminum tubing. Com-Pac uses 7/8 inch tubing on all of its pulpits including the pulpits on its larger boats. In this example, we bent a new longer piece of aluminum tubing and used 2 short 1-inch pieces of stainless as splices. You could cut the pulpit, use the existing aluminum in front of the splice and make your splices longer on both sides. The results would be the same.
Stainless steel tubing is really flat metal that's welded together by a machine. It has a ridge on the inside where it was welded. Sometimes this ridge must be removed or rimmed to make 7/8 inch tubing fit inside 1-inch tubing. Filing or sanding the ridge inside a short piece of 1 inch is easy and sometimes not required. Tubing made by different companies may not fit. The inside diameter of tubing is a gray area and very little is published about this dimension.

DIY 8: We recently talked to someone (In Answers) about the Sun Cat cabin liner and how well it could hold heavy objects. The answer is better than I remembered. The liner in the picture below is very thick, but I don't think you can count on every liner being this thick. The hole below was cut over another hole that held a depth sounder that didn't work. A depth sounders is one of few marine instruments that has to tested in the water. This boat made a trip to the launching ramp and the new depth sounder was tested after installation. The job is done when the new installation works.

DIY 7: Buffing your gel-coat after it has become chalky is the best way to get your boat back to looking new. Using a white compound is the way to remove the chalk and flaws from gel-coat, but that procedure does require a good machine and some experience by the user. Most of the chalk removal is accomplished while the compound is still wet. As the compounds dries, you reduce the pressure on the machine and that technique produces the shine. You remove or cut the chalk and flaws while the compound is wet and then polish the gel-coat as the compound dries. I said that twice because that's the technique that works and you need to practice that procedure. A good machine is an automotive buffer that sells for more than $100. It has the muscle to make the compound work. Normally, little baby buffers do not work that well.
You could buff through the gel-coat if you buffed in the same spot for a long time. I have never buffed through the gel-coat on a Com-Pac Yacht and I don't think that's a problem. Make sure you wash the boat after buffing and then apply a good wax to finish the job. The little 16 in the picture has a painted hull. The original deck gel-coat including the non-skid was buffed and waxed with good results.
The red 16's hull was spray painted using AWLCRAFT paint. AWLCRAFT is used by professionals and can only be applied with a spray gun. AWLGRIP paint is a sister paint that can be applied with a paintbrush or a roller and can be used by anyone. Once the paint is hard, you use the same buffer technique to make the AWLGRIP paint look like it was spray painted. I could repeat that same sentence for the third time, but I think you get the idea. Paint looks better over a longer period of time than gel-coat and if you sail a boat built in the 80s, your boat is going to need some cosmetic paint before long. We don't like painting decks for several reasons and that will be the subject of another project.

DIY 6: Some Com-Pac owners worry about stuffing box leakage. That's the device that stops shaft leakage if you have a diesel motor. Most sailors want to know how much leakage is acceptable. The answer is none if your boat is in the water and hasn't been used for 24 hours. The correct leakage rate for a boat that's being used is in drops per minute. The drops are hard to measure and you may not see any drops while the shaft is turning. You will be able to see a bathtub ring in the area where the drive shaft enters the box. Counting drops after using your boat doesn't count. You have to wait 24 hours for a good measurement. Stuffing boxes are suppose to leak while the drive shaft is turning and they will retain water when the shaft stops. Leaking water provides the lubrication and cooling needed for the shaft and the stuffing box. If you have a dry stuffing box after 24 hours and it puts out a nice spray while the shaft is turning, your stuffing box is working correctly and it doesn't need to be adjusted.
Most stuffing boxes on shoal draft sailboats work pretty well. The stuffing box is really located at water level or maybe a little below water level if the boat is loaded. You can see where the stuffing box shouldn't leak if the stuffing box seal is at or above the water line when the motor isn't being used. Sailboats with engines installed in their keels or where the stuffing box is located at some depth below the surface have more difficulty with leakage. Shaft rotation moves water to the stuffing box seal for lubrication and cooling on shoal draft boats.
Proper stuffing box adjustment is where you tighten the stuffing box cap until you can't turn the driveshaft by hand. You loosen the cap to a point where you can turn the driveshaft by hand. The shaft will be hot or warm to your touch until the adjustment friction has been reduced with use. This is normal. An important point to remember is that you hold the stuffing box body with a wrench when you break the locknut and hold the stuffing box cap when to tighten the locknut. If the body doesn't have flats like the one in the picture, use a pipe wrench to hold the housing. Screwing the cap in and out should be accomplished by hand. If the stuffing box is old or corroded, you will need a wrench. Remember to always use 2 wrenches when you work on a stuffing box. You will be twisting the connection between the rubber hose and the stuffing box if you use 1 wrench. Most Com-Pac Yachts may never need new sealing flax if the correct adjustment procedure is followed when needed.
The picture below shows the cap on the right, the lock nut in the middle and the body on the left. The hose on the far left is the connection between the stuffing box and the stand-pipe that holds the cutless bearing at the stern.

DIY 5: How many sailors like colored hulls? I think the answer is that most people like colored hulls and that's what they are buying. They are one of the popular options on sailboats being built today and they do look good when they are new. Keeping them looking like new can be a problem because dark colors show flaws more readily than our white hulled boats.
Most new owners want to wax their hulls and keep the color protected as long as possible. They use a quality marine wax with mixed results. The boat shines, but now they can see all of those little white spots that they hadn't noticed before. You don't see the same type of flaws in a white hull after waxing. The difference is the color and what our eyes see.
The recommended wax for your colored hull is a COLORED WAX. Car-part stores sell that type of wax for dark colored cars. The wax can be used on gel-coat and it really works. The residue that left behind after waxing a hull with that type of wax is the right color. If you have already waxed your hull with a white marine wax, it may take some time for the new wax to settle into those small pinholes and make them disappear. When your flaws are filled with a colored wax, your eyes will only see a pretty hull that shines. That's what we call magic. The first picture below shows a blue hull that's been waxed with a marine wax. White pinholes were located on both sides of the Com-Pac logo. After waxing the right side with a colored wax, the white pinholes on that side have almost disappeared. The second picture shows the wax we use on green hulls.

DIY 4: Rudder bearings help make precise sailing possible and they improve the feel of sailing. The definition of sailing is making a boat move in a balanced condition with wind power. The feel you get from the tiller tells you how well your sailboat is balanced (weatherhelm) and is an important part of sailing. After a few years of use, most small Com-Pac sailboats have enough slop in the rudder to make precise sailing difficult. If you plan on installing an autopilot in your Com-Pac sailboat, you need bearings first or the autopilot will discharge your battery while it is trying to maintain a heading.
Com-Pac sells after-market bearings for your rudder. The easy way to install these bearings is to remove the complete rudder including the part that's bolted to the transom. You need to drill the existing holes (pictured below) to 31/64 inch. You can use a drill press or a hand drill for this purpose. 4 holes need to be drilled, 2 in each rudder part. You will install 4 bearings. After drilling the holes, your new bronze bearings can be pressed into the rudder housing with a standard shop vise. This modification is easy to do and you will be happy with the results. The picture below shows the housing drilled and the bearing in position ready to be pressed.

DIY 3: Pettit paint products recommend a 12-mil thickness for its barrier coat system. The reason for having a barrier coat on your boat is explained in Project 2 below. The thickness of a barrier coat determines its blister protection capabilities and we recommend owners measure this thickness when your bottom is painted. The thickness of a business card is about 12-mil and we can use one to measure the thickness of our paint. Holding a business card next to the painted edge is a good way to measure your protection. You can feel the size difference as you rub your finger over the joint between the card and the paint. We see new boats every now and then with thin bottom paint. Maybe the maintenance person didn't know about the 12-mil rule.

DIY 2: All owners that sail their boats on lakes sometimes wonder why they need bottom paint. Bottom paint is designed to resist marine growth and we all know the lakes don't normally have barnacles and other marine growth. A new boat still needs barrier coats and bottom paint if the boat is going to live on a lake because we need to avoid gel-coat blisters. In this country, all sailboats have colored gel-coat on their bottoms. Some English boat builders build their boats with a clear gel-coat because they know about the pigment problem. The color pigment in gel-coat is a material that can dissolve. If the pigment dissolves, it leaves a void in the gel-coat that can cause gel-coat blisters. White boats have pigment in their gel-coat just like the blue boat below. Seeing the differences between the top and the bottom on a white boat is more difficult. The little gel-coat bumps will be there on both boats. If the boat is going to stay in the water, a new boat needs to be properly prepared. An old boat doesn't need fresh bottom paint, but it does need bottom paint. If an old boat has never been painted, you do the barrier and bottom paint.

DIY 1: All Com-Pac Cat Boats need a mast plug. This keeps rainwater from running down the mast stub and into the boat when the mast is folded. You purchase a piece of Starboard (a white plastic material) from West Marine. Any thickness will do, but thicker is better. Put a piece of carbon paper on the mast stub and tap the board that's on top with a hammer to make an outline. Another way to make a pattern is to use some thin cardboard. Lay the cardboard on top of the stub and use a small hammer to tap the inside mast edge through the cardboard. Using a jigsaw or bandsaw, cut to the inside line making the plug just a little large. Sand the edges with sandpaper. Then hammering the plug in place gently will shave a small amount of Starboard off the edges for a tight fit. You can see the shavings in the picture below if you look close. You also need to caulk the mast grove at the deck level for a dry boat. Current new boats come with a mast plug.